![]() >Backup and Restore OnePlus 7T/ 7T Pro
>Backup and Restore OnePlus 7T/ 7T Pro
![]() >Backup and Restore OnePlus 7T/ 7T Pro
>Backup and Restore OnePlus 7T/ 7T Pro
The new OnePlus phone comes with the legacy of the OnePlus 7 Pro that you would notice right from its first glimpse. The smartphone flaunts a pop-up selfie camera design and shows off an edge-to-edge display. As an upgrade, there is the Qualcomm Snapdragon 855+ SoC that enables an enhanced gaming experience. The OnePlus 7T Pro also runs Android 10 out-of-the-box -- along with the proprietary OxygenOS skin on top. Of course, new experiences will also bring out new mobile phone problems, such data backup and restore. People rely on their smartphones every day, and losing the data those devices contain can be as disastrous as suffering through a hard-drive crash on a proper PC. That’s why it’s important that you back up OnePlus 7T/7T Pro as regularly and carefully as you do your other devices.
If you are planning to a factory reset your OnePlus 7t/ 7t Pro, give your OnePlus 7t/ 7t Pro for repair,switch OnePlus 7t/ 7t Pro to new phone, want to upgrade the version of OnePlus 7t/ 7t Pro, we still recommend you to copy your backup to your computer and restore it once you need them in one day. To ensure your OnePlus 7t/ 7t Pro data’s safety, this passages provides several methods on data backup and restore to avoid any data loss.
By using Google Drive to back up your android data is to upload your mobile phone data and files to Google Drive account. Google Drive mainly serves as a cloud place to save your old data. When you switch over to OnePlus 7T/7T, you can copy all the data from Google Drive account, off which you took backup from old Android smartphone.
Tap the menu icon on the left >> Tap Settings >> Under the Google Photos section, toggle the Auto Add switch to turn on and allow photos to be backed up and restored.
Swiping alongside to tap Backup and Reset >> Tap Google backup >> Turn on Back up to Google Drive, confirming Back up to Google Drive is turned on. If necessary, tap the switch to turn on.
Verify Google account: Verify your Google account is correct. If you need to change the account, tap Account, then tap the correct Google account name or add a new account.
Since your backed-up data is accessible with your Google Play account information, you can simply link your new phone to that account when you first boot it up. You can also change the Google Play account you're using at any time in the Settings menu.
Tap App data >> Turn on Automatic Restore >> Confirm the Automatic restore switch is turned on. Tap the Back icon (upper-left) to return to the Settings page. If Automatic restore is turned off, tap the switch to turn it on >>Back up to Google Drive: Tap Back up now.
You're all done: The timestamp updates once the content has completed backup. After setting up your new phone, follow these steps again to ensure you're backing up important content.
Pro: Get 15GB of free storage, you can also upload your files to Google Drive and organize your own Google structure tree based on your need.
Transferrable Contents: Contacts, Call logs, Messages, Notes, Pictures, and Audio etc.
If you are a OnePlus loyalty, you would be familiar with this tool- OnePlus Switch. That iPhone has iCloud is what OnePlus 7T/7T Pro have OnePlus Switch, which puts all your files in a safe place within reach from phones. It would be in luck if you have happened to have OnePlus 7T/7T Pro, you would be easily backup and restore your device. The data backup function can back up your data safely and completely for restoring when it is needed.
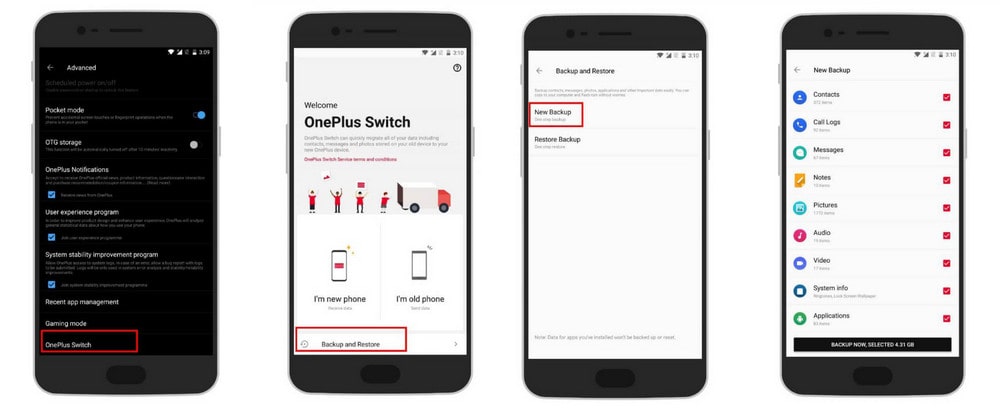
Step 1To find out the OnePlus Switch app on your phone, go to Settings >> Advanced >> OnePlus Switch. And then enter the application.
Step 2Still inside the OnePlus Switch app, navigate to 'Backup and Restore' where you can choose either 'New Backup' or 'Restore Backup'.
Step 3 Tap 'New Backup' to create a backup folder. You would be guided to selectively back up your desired files and data. And then kick 'Backup Now' to wait until the process finished.
Step 4Once the app is done backing up your data, simply hit 'Done'. Oneplus Switch will store your backup inside 'Backup/Mobile Backup' folder.
Step 5 Restore the Backup created from OnePlus Switch app, similar step to navigate to the Oneplus Switch app, hit Backup and Restore >> Restore Backup >> Choose what files you want to restore. OnePlus Switch will help you to restore Contacts, Call Logs, Messages, Notes, Pictures, Audio, Videos, System Info and will also install all the Applications which were backed-up.
Con: It will take up certain space in your device. Sufficient storage space is required if you migrate a large amount files. If get stuck in this step, you can clear up space or choose to backup part of the data.
Transferrable Contents: contacts, call logs, messages, notes, pictures, audio, video, applications (excluding data) and some of the system info such as ringtones etc.
This method is for users who want to back up certain contents but not to back up all the mobile phone data. If you are restricted by your phone storage and want to free up more space, you can use Syncios OnePlus Manager to selectively back up your contacts, Music, Video, Photo, Apps and Messages. The cutest part is that it is free to use on this bakcup and restore feature.
Step 1 Having downloaded and installed Syncios OnePlus Manager, run it. You would find that it is kind of a higher replacement of iTunes. While this program is fully compatible with iOS and Android devices regardless of the brand, let alone OnePlus 7T/7T Pro.
Download
Win Version
Download
Mac Version
Step 2 Connect your OnePlus 7T/7T Pro to Syncios OnePlus Manager. You should at the same time to enable the debugging mode, install the Syncios.Apk (not take too much space at all) until Syncios OnePlus Manager recognize and detect your device. It would show Connected on your phone.
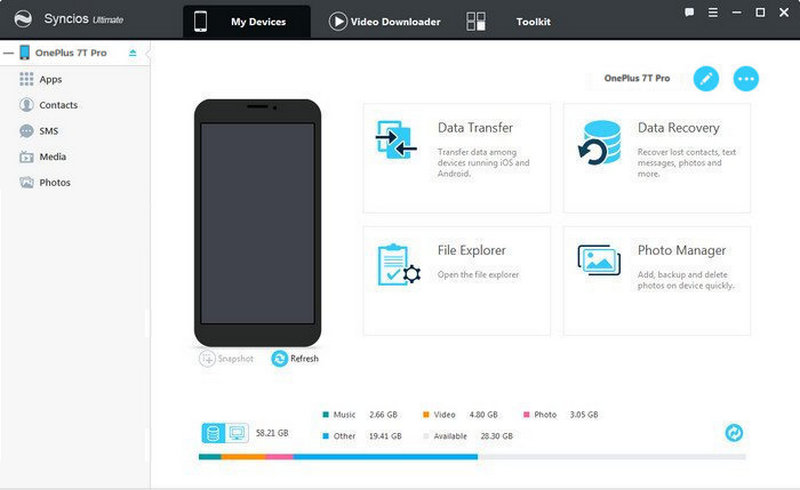
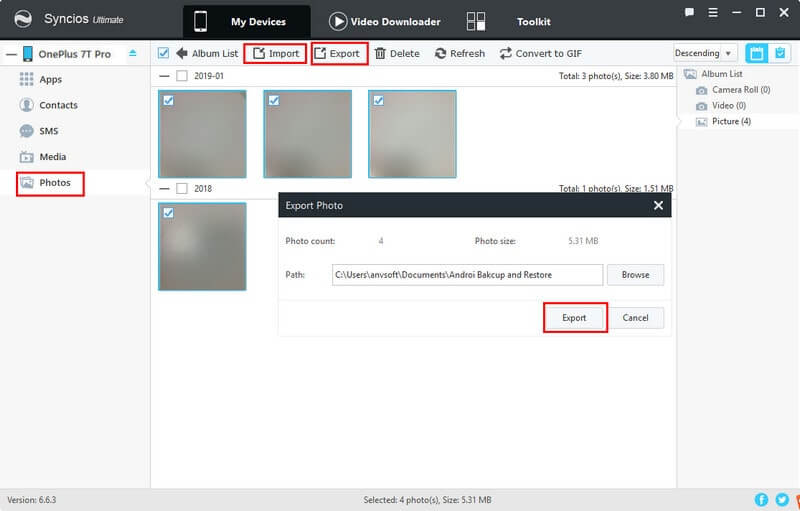
Step 3 Look into the left panel on the interface on Syncios Manager, navigate to any optional block like Contacts, Messages, Photos, Apps and Media. Let’s go to back up photos as we know that is a super space occupation on your phone.
Step 4 Click on Photos and enter the management of the photos on OnePlus 7T/7T Pro. Selectively check for the photos you want to export to PC and then kick on Export button(meaning backup to PC).
Step 5 To recover the backup files, simply kick on Import to have your photos back to the phone.
Tip: By entering one of the functional file management, Syncios OnePlus Manager allows you to export (Backup) and import (Recover) the files at ease.
Syncios OnePlus Data Transfer provides you a method to backup and restore your OnePlus 7T/7T Pro by One-Click. You can directly transfer all the contents include contacts, messages, call logs, music, photos, videos, apps, bookmark and more to PC by one-click. Here is how to do it.
Step 1 Download and install Syncios OnePlus Data Transfer on your PC or Mac. PC system will automatically create a shortcut to the program on your desktop.
Download
Win Version
Download
Mac Version
Step 2 Run Syncios OnePlus Data Transfer, 3 functional features (Transfer, Restore, Backup) show up in the program drawer so here you should navigate to Backup module.
Step 3 Connect your OnePlus 7T/7T Pro to PC with appropriate cable, enable USB debugging mode on your phone, and install Syncios Apk on your phone in order to successfully to backup data from OnePlus 7T/7T. Otherwise, Syncios program would not recognize or detect your device correctly.
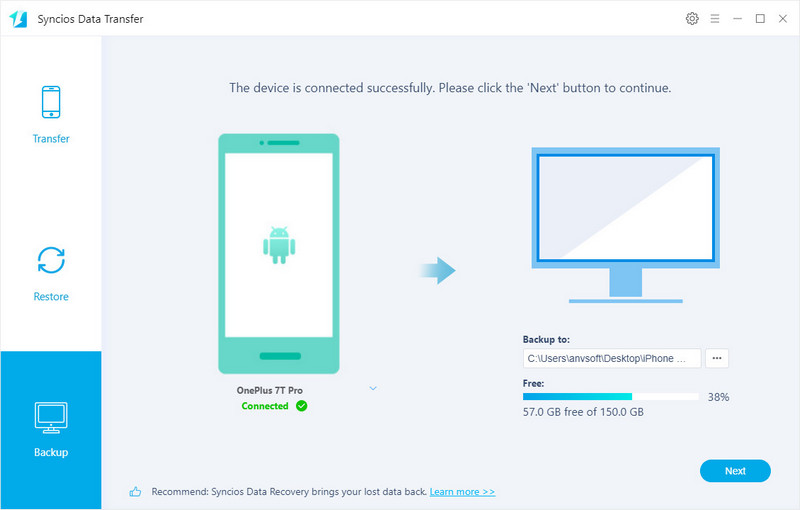
Step 4 Under Bakup, you can customize the path you want to store the backup on your PC. Below Syncios also shows you the total size of the storage you can backup. And then click on Next button.
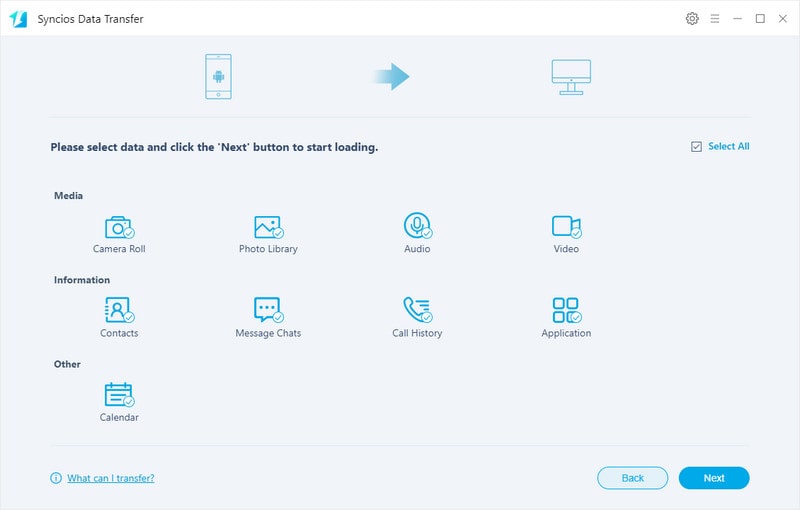
Step 5 Now you are inside Backup mode to select the files you want to backup. Get everything settled, and you can start the backup. Once the app is done backing up your data, simply hit Done. Syncios OnePlus Data Transfer saved your backup to the path you created.
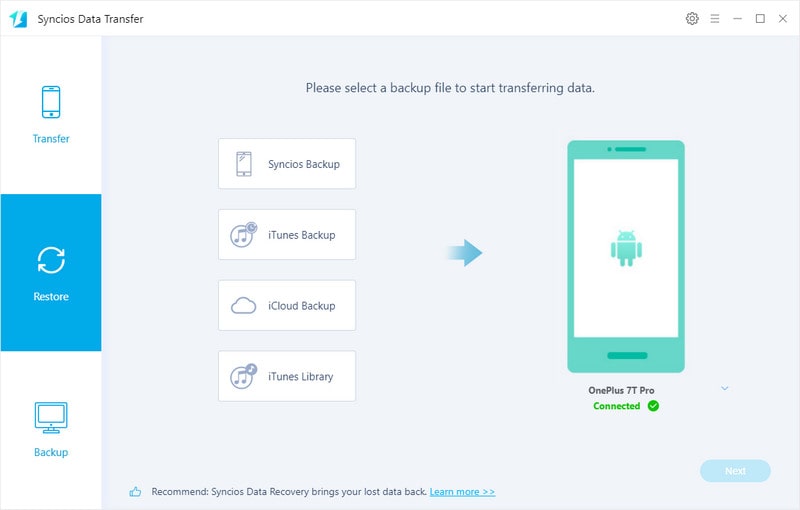
Well, it is quite easy. Once you have backed up your device to PC, you can recover them to your device at ease. Note, keep the backup folder in the same path and no change of the folder name on PC.
This time, navigate to Restore module. Hit Syncios Backup then select a Syncios Backup files to transfer. Syncios OnePlus Data Transfer will seamlessly restore all the data you have backed up previously. Being a data-transfer program first, Syncios OnePlus Data Transfer lets you transfer your data from PC to your OnePlus 7T/7T with just one click.